
Get Wheel Delivery from just £30

  • Choose Vehicle
  • Favourites
  • Basket

Get Wheel Delivery from just £30

  • Choose Vehicle
  • Favourites
  • Basket
Blogs Blogs

How to Fix Gutter Rash on Alloy Wheel Rims

Gutter rash, also known as ‘curbing’, is a terrible blight of modern day living, as anyone with a set of shiny new alloy wheel rims will attest.   Touching the curb, either by misjudging a corner or scraping during parking causes the most unsightly damage to alloy wheels, as the gra
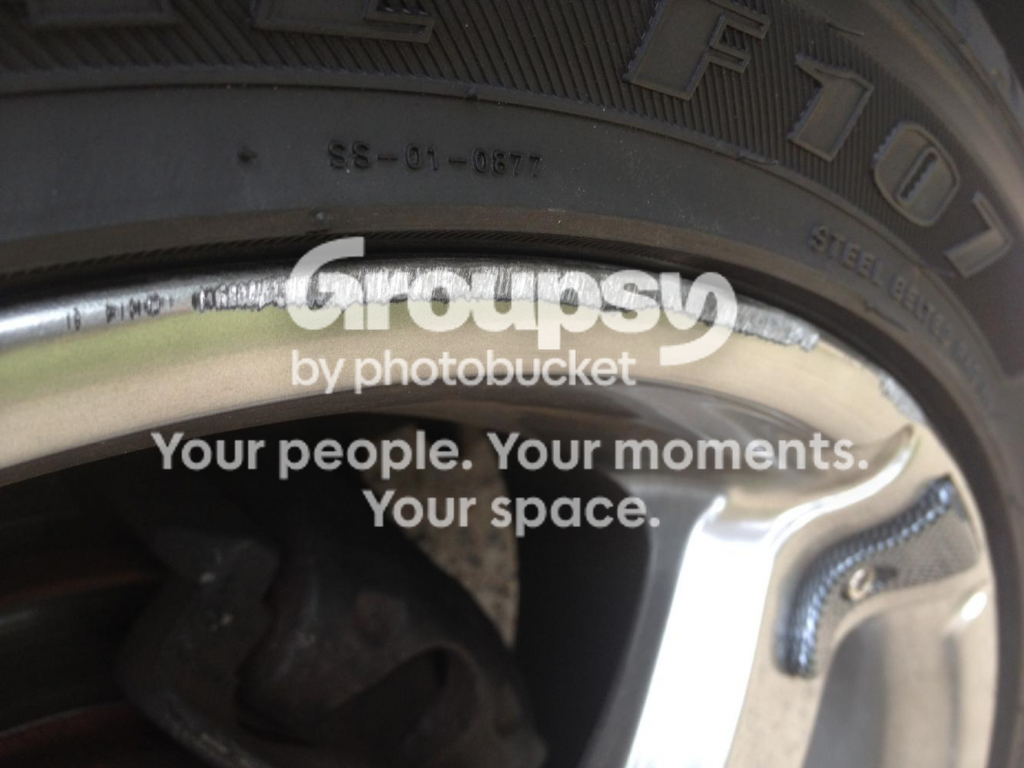

Gutter rash, also known as ‘curbing’, is a terrible blight of modern day living, as anyone with a set of shiny new alloy wheel rims will attest.


Touching the curb, either by misjudging a corner or scraping during parking causes the most unsightly damage to alloy wheels, as the granite comes into contact with soft, shiny metal. It can manifest as a dent in the outer wheel rim, scratching and scuffing of the wheel surface, or in extreme cases, it can damage the seal enough to allow the tyre to leak air. 


It’s entirely possible to go to a shop and get the rims seen to though. There, they mount them on a lathe and take a thin layer of metal off, leaving a smooth, immaculate finish, which is then re-sprayed or lacquered.


If you’d rather do it yourself, you’ll need to take the wheels off the car and the tyres off the wheel, so it’s a bit of a job, needing a well-equipped, well-ventilated workshop and either another means of transport, or another set of wheels for a couple of weeks whilst you sort out the rash. Put it this way: it’s not a process that can, or should, be rushed.


Think you’re up to the task? Here’s our 14-Step process for taking care of your gutter rash.


Image Credit


Step One


Take off any lead balancing weights. You’re going to need to get the wheels rebalanced before you put them back on the car. Clean the wheel thoroughly.


Step Two


For serious rash, you will need to get rid of the worst of it with a file. Don’t try and completely remove the curbing, or you might alter the wheel’s shape. You just need to remove anything standing proud of the surface.


Step Three


Roughen the entire surface of the alloy. You want to achieve a matte finish using a 600 grit sandpaper, and clean as you go with copious quantities of water and detergent. If there’s any corrosion, take it down to the bare metal. Give special attention to the wheel rim as this is where most of the damage is likely to be, but it can easily get overlooked.


Image Credit


Step Four


Ensure the wheel is perfectly clean and completely dry, including any dings or dents, to ensure that the filler properly adheres. P38 body filler, or ‘chemical metal’, is ideal for this job. Follow the manufacturer’s instructions, but allow at least 24 hours before the next session of sanding.


Step Five


Again using plenty of water, smooth down the filler using 400 grit sandpaper. The plan here is to create a uniform wheel shape, on the flats as much as the rim, so don’t get carried away. If you do, no biggie, just return to the previous step and add more filler.


Step Six


Spray-filling will plug any fine holes, either in the wheel or the filler itself. It might seem like a fuss, but it’s really worth doing as it produces a flawless, even finish that’s great for spray-painting.


Ensuring the wheel is clean and dry, and following the instructions on the can, apply three even coats of spray filler. Leave around 15 minutes between coats. To prevent the filler hardening in the kit, soak the nozzle in thinner between coats to be sure your last coat is as good as the first.


Once you have put on the final coat, have a quick check for any remaining defects. If relatively insignificant, they may well sand out, but allow at least 24 hours to dry before going back to sanding to allow the filler to harden properly.


Step Seven


This part of the process is basically to get the surface totally flat, taking it back to the metal in most areas. Maintain an even pressure, taking in the whole of the wheel, to create the smooth surface you want.


Frequent cleaning and drying during sanding will help ensure that you’re doing it evenly. Remember that if you take off too much, you can just go back one step. Patience is everything.


Step Eight


Did I say make sure the wheel is clean? Try to use a primer that closely matches your finishing colour. Again, following the instructions on the can; three light coats, allowing 15 minutes between each, always aiming for even coverage, particularly in the hard to reach places. Allow at least a day for the paint to dry before going to the next stage.


Step Nine


Using 800 grit sandpaper with plenty of water, sand the whole wheel flat. You need to achieve a consistent, smooth base to sit under the paint, so that you’ll have a flawless finish as your end result. Go easy though, and try not to burn through to the metal.


Image Credit


Step 10


As before, three light, even coats of lacquer, allowing 15 minutes between each. The knack is to spray the wheel interior before the face, not forgetting the rim, working towards an even coverage across the whole.


Aim for an even, matt finish, where the colour appears uniform throughout. You can always add more paint where it’s needed. It’s really useful to wire hang the wheels if you can, allowing them to dry and the following process to work without needing to handle them at all. Allow another 24 hours to dry.


Step 11


No need to wash or sand the colour coat, just ensure there’s no dust or grease on the surface. This means no touching with bare hands!


Apply the standard three coats; the first one being the lightest, then slightly heavier thereafter. Don’t be aiming for a gloss finish, or the lacquer will go on too thick and start to run.


Remember to leave 15 minutes between each coat, interior first, then the face, incorporating the edge. If there’s any ‘orange-peeling’. this can be addressed once the lacquer has dried.


Step 12


A potentially long process of sanding and polishing follows, but only if your existing finish is dull or orange-peeled. If you’re already satisfied with the finish, proceed to Step 13.


Let the paint dry thoroughly. Painters generally recommend two weeks. Without a professional baking oven at your disposal, this is pretty much de rigueur.


If the paint does need some re-working, use a very gently applied 1500 grit paper (plus lots of water with detergent) to remove any orange-peeling on the surface. Don’t burn through; dry off and inspect regularly to check your progress. You’ve finished when you’ve achieved a totally smooth, matte effect.


Image Credit


Step 13


Buff with polishing compound and a buffer, if you have one, until the entire wheel really gleams. Again don’t be over enthusiastic, as you are still removing paint with this process.


Step 14


Just one more time, wash and dry the wheel. Apply either a proprietary wax or sealant to finish.


You’re then ready to put the tyres back on your wheel. I recommend you get a professional do this for you, to minimise any damage to your shiny new paintwork.

Previous Article
Awesome Car Collections: Kanye West
Next Article
How to Keep Your Alloys Gleaming Through Winter

Get in touch

Questions about fitment, finance, or an order you have already placed? Our advisors know these wheels inside out and are happy to help.

Contact us
Contact us Contact us

Frequently Asked Questions

View all
What should I do if my order is delayed?

Most delays are temporary. Follow these steps:

  1. Check your tracking link in the Shipping Confirmation email.
  2. Wait 24–48 hours after the estimated date — carriers sometimes update late.
  3. If no update in 3 business days, contact us with your Order Number and Tracking Number.
  4. We’ll investigate and either reship free or issue a full refund if lost. Note: During sales or holidays, add 1–2 extra days.
Can I change my delivery address after placing the order?
Unfortunately, we are unable to amend delivery addresses once an order has been placed. For security purposes, items can only be dispatched to the billing address associated with the payment method. We kindly ask that you carefully review your shipping and billing details at the checkout screen before confirming your purchase
What will happen if I miss the courier?

The delivery driver will leave a card saying that he has made a delivery attempt, along with instructions on what to do next.

What should I do if my delivery is overdue?

We do ask you to allow up to three working days for courier deliveries. If your goods still have not appeared after that time or no one has contacted you by email or telephone, please email us at [email protected].

How do I track my order?

After placing an order online, you will receive a confirmation email. Following this your order will be set to processing and then delivered once it has been dispatched. After you receive the delivered notification via email, you will receive an email or text message from the courier with your tracking number. 

I have not received an invoice - what should I do?

Although we carry a large range of wheels and tyres in stock, we cannot have everything, so in some cases if a product is being sent directly from the manufacturer an invoice will not be included in the parcel. You should receive an invoice by mail a few days later. If you do not receive an invoice, please email [email protected] so we can arrange a copy.

What happens if my goods arrive damaged?

Very occasionally goods get damaged in transit. We always inspect the products before we pack them but after they leave our hands accidents do happen. Please sign the delivery docket with the driver 'damaged' if the outer packaging looks damaged in any way. We then ask you to inspect goods upon receipt and notify us of any damage within 24 working hours by calling us on 01274 877787 or sending us an email at [email protected]. 

If the goods have been damaged in transit and are faulty, we reserve the right to replace the product. We will of course arrange a collection for the damaged parts and arrange replacements as soon as possible. Please keep all packaging and do not try to fit the damaged parts.

I’ve received the wrong part - what should I do?

If something is not right about the goods that you have received, please email us at [email protected] or telephone us to let us know. All goods are sold to the manufacturer's Conditions of Sale and Guarantee. Goods specially ordered cannot be returned for credit. We reserve the right to make a handling charge on goods returned against orders correctly executed.

What are the advantages of alloy wheel upgrades?

Aftermarket alloys are typically lighter than their stock counterparts, reducing unsprung weight and improving the performance of your car. They’re also available in larger diameters and widths, allowing larger brakes and wider tyres to be installed for increased cornering performance and stopping power.

What is the lifespan of alloy wheels?

Alloy wheels have a far longer lifespan than steel wheels. When well cared for, they can last for decades - and they can be easily refurbished and restored to look as good as new.